Sunday, October 9, 2011
Mixed Media on Canvas
I decided to play with a canvas and try to make a painting for my sister-in-law. It's was tough to figure out, because I wanted to use Tim Holtz inks, but they don't stick to a pre-primed canvas. So first you have to paint it with acrylic paints. I used painters tape to block off the areas, painted with acrylics and then I could ink with TH inks. I also used Rangers color wash, Maya Mist and Glimmer mist. I cut an "a" from my circut and used the negative space. I taped it down with painters tape after I had all my color done. Then I sprayed the "a" with glimmer mist. let it dry over night. In the morning I taped down the "a" itself and cleaned up any edges I need to. It was really fun and I felt like a real Artist. It turned out better then I thought.
Thursday, August 25, 2011
Look to the world around you for inspiration
When I scrapbook I like to look to the world around me, and like many, I've been addicted to Pinterest lately. That addiction inspired me to create a vintage style page with a corkboard "pinned" with photos of some favorite finds taken during a few junkin' adventures. I also love the idea of "diamonds and denim" and wanted to mix textures that were blingy and fabulous, with other embellishments that had more of a simple everyday feeling. With all of that in mind I set out to create this page.
Click image to bigify
Supplies: Patterned paper - Pink Paislee; floral vine - Prima; Scalloped boarder - Sizzix Die; Tulle - Bazzill; beaded spray - craft supply; Rhinestone button - Bazzill; cork - Lifestyle Crafts/Quickutz; Chipboard Letters - Basic Grey with Sizzix Embossing folder; kraft journaling spots, pink resin flowers black ribbon flower, yellow felt flower - Maya Road; Pearl strip - Recollections; Paint, brads - Making Memories; font - Bohemian Typewriter
A little birdie tells me that there is some satin ribbon on the way to That Scrappy Girl, so you too can be making your own fabulous satin flowers!
Friday, August 19, 2011
JB Mini Summer Album
I ran across a Maya Road Chipboard mini album while cleaning my scraproom. I had some Jillibean left and so I came up with this cute little summer album.
Monday, July 25, 2011
Craft Fusion: The selling power of Mixed Media
What does Mixed Media mean to you? Each person has their own interpretation of mixed media and the great aspect is that there are NO RULES. Art is in the eye of the beholder and Mixed Media is no different.
Mixed Media was this year's CHA summer show theme. CHA and acting president Tony Lee are encouraging the craft and hobby industry to "expand their vision."
By combining different materials in unique ways, crafters can be especially creative and achieve dramatic, non-traditional results" says Lee. He continued to say that "Mixed Media is more than a fad, but represents a shift in how younger craft enthusiasts are expressing their creativity."
Exhibitors specializing in Mixed Media were present at the show and none to eager to show off all of the amazing projects that can be created with their products. Here are some pics of a few projects I saw:
Look for a little Celebrity Spotting and giveaway next post, so stay tuned!
{{hugs}},
Mimi
Labels:
Craft Fusion,
Maya Road,
Mixed Media
Saturday, July 23, 2011
Sneak Peek! Introducing the Silhouette Cameo!
As most of you know I just returned from the CHA Summer show. We had a wonderful time and have come back more inspired, it's hard to express.
For all of your Silhouette lovers or if you have been on the fence about buying a die-cutting machine, your wait is over. The hit of the CHAS show hands down was Silhouette America's introduction of the Cameo:
The Silhouette Cameo is "an electronic cutting tool that connects to your home computer just like a printer. However, rather than printing images, the Silhouette cuts out designs and text"
According to the Silhouette America sales guru TJ, the new Cameo is expected to be out mid October. Pre-Sales order will be available during the month of September. The MSRP for the new Cameo is $299.
So, want more deets?
The Silhouette cuts a variety of media, and the new cutting blade which is expected to be released with the Cameo will cut CARDBOARD! WooHoo! The blade is still in production, but the team is hoping it will be included with the new machine. Keeping our fingers crossed!
More BIG NEWS! The new Cameo will cut designs and texts from 1/4" to 12" wide and 10' long. AMAZING!
The Silhouette Cameo will have the same features as the Silhouette SD, but get this...it's QUIETER! Not only that, the cut is more precise and more exact! I was an eye-witness and just LOVE IT!
Also released at CHA: Fabric Ink Starter Kit, Vinyl Starter Kit, Rhinestone Starter Kit and Heat Transfer Starter Kit...So fun, the ideas are just endless.
So stayed tuned for pre-sale offers available sometime in September. I think the Silhouette America team are top notch and would make a great addition to the That Scrappy Girl store. Keep tuned for pre-sale offers coming in September. Here is some more eye candy:
{{hugs}},
Mimi
Thursday, July 21, 2011
Makin' a list....
...and checkin' it twice! No, it's not Christmas in July, but it certainly seems like it with all of the great new products being released at CHA (the scrapbooking industry trade show) this week. I'm totally bummed that I couldn't make it to the show itself, but that certainly hasn't kept me from pouring over sneak peeks from all of my favorite manufacturers.
Here's my list of gotta have items:
1. October Afternoon's new lines: Sasparilla, Sidewalk, and Farm House.
Here's my list of gotta have items:
1. October Afternoon's new lines: Sasparilla, Sidewalk, and Farm House.
Maya Road -especially loving the new wood doilies, the kraft and wood snowflakes, and ... well, pretty much everything! I'm also totally digging the banner chipboards. Wouldn't those be great for cards and little subtitles on pages?
And wouldn't these flowers be just perfect for a retro layout?
If you love Maya Road stuff as much as me, you can download their full catalog here and start making your very own Christmas list.
Of course I am also drooling over the new Unity Stamps and the Doodlebug Twine. Their colors + small spools of 20 yds for $2.99 = in love :)
Leave us a comment and tell us what you just gotta have!
-Mollie
Labels:
cha summer 2011
Saturday, July 16, 2011
Unity stamps by Marah Johnson
So i played with my Unity stamps today, it was so muc fun! I had joined in on a color challenge, and was really struggling with the colors given to me they were "cement","Chamois Brown","Mint Green" and charcoal.
I was like HMMMM what the heck am I going to make with this?
So after struggling with several things that I wasnt likeing, I finally decided to go for a "steampunk" sort of look. Now this is my first steampunk page, so I am not sure if I captured it right, but I like the overall design. I started with some embossed cardstock from artsylicious, rubbed on some copper ink, then a black cardstock and started to randomly stamp with ivy brilliance ink using the stamps from marah johnson by unity both the "art and soul"and "breathless". I also used some versamark ink and perfect pearls, and silver embossing powders on the background. I layered on some black lace and cut the dressform and wings with my wishblade,I used some rub-ons from heidi grace, and some watch parts from ranger and all of the other embellies I made with my melting pot,Utee and embossing powder.
the hidden journaling reads,, ""some days are hard, your thought run away with you and you feel sad and defeated. stay strong sweet girl, for the good days greatly out number the bad, try to think "no more bad days, stay strong" and it will pass,you will be happy, I promise!"
So what do you think? is it a keeper?
thanks for looking!
Thursday, July 14, 2011
Get Mowtivated
Following our unofficial blog theme as of late, I thought I'd put together a little card using the new Unity Watermelon Gazpacho stamp set.
So, if you've been a little behind on your scrappy projects lately, consider this blog post sending you a little "mowtivation" this week courtesy of That Scrappy Girl. :)
To create the grass
-Cut along the edge with the Martha Stewart scissors.
-To make the finer blades of glass, space your cuts half of the normal distance of the scissors.
-Once you've made your away along the length of the strip, use regular scissors to vary the ends of the blade lengths. (I would describe cutting technique used as similar to how you would cut your bangs if you didn't want them blunt cut.)
-Mollie
So, if you've been a little behind on your scrappy projects lately, consider this blog post sending you a little "mowtivation" this week courtesy of That Scrappy Girl. :)
Supplies: Watermelon Gazpacho Stamps from Unity; Markers by Copic; Ink by Momenta and Colorbox; Fringe Scissors by Martha Stewart; Label die by Spellbinders; Embossing folder from Cuttlebug; Ribbon from Jillibean; Cardstock by Bazzill. Products are available by special order from That Scrappy Girl.
-Cut along the edge with the Martha Stewart scissors.
-To make the finer blades of glass, space your cuts half of the normal distance of the scissors.
-Once you've made your away along the length of the strip, use regular scissors to vary the ends of the blade lengths. (I would describe cutting technique used as similar to how you would cut your bangs if you didn't want them blunt cut.)
-Mollie
Labels:
unity stamps watermelon gazpacho
Thursday, June 30, 2011
Summer Days with Echo Park
The bright colors of Echo Park's Summer Days is perfect for these summer play pictures. Just playing around, dancing and twirling in the outdoor sun. Maddie brings these bright colors alive. I just love Echo Park. The designs are so bright and fun. I enjoy putting foam squares under the stickers to help them pop from the page, like the banner stickers. Cutting just a simple circle from such bright and colorful patterns add a lot of design to your page. I added buttons to the centers of the flower stickers to give them dimensions and used the letters in the kit to cover a label with maddie's name .
Monday, June 27, 2011
Mojo Monday! Crafting with Kids and Shimmerz Paints!
Happy Monday! I hope everyone had a scrappin' fun weekend. So we're in full swing for summer and it's been a little rainy here in Des Moines. So, I decided to get some paint out and let the kids have some fun. Here's what they came up with...
I received some samples from a company called Shimmerz Paints and W O W is this a FUN, FUN, FUN product line. I can't wait to see them at CHA...I'm thinking I need to place an order and let the creatitivity flow.
Shimmerz are premixed. No recipe, no mess. *They are rediculously shimmery. *They dry on glossy or non-porous surfaces, perfect for use on acetate or metal. *They are made in the USA. *70 Options Available: 39 Spectacular colors of Shimmerz, 11 Brilliant shades of Blingz, and 20 Fabulous Choices of Spritz! *They are non-toxic. *They are water-based.
Shimmerz also has a great channel on You Tube. I scraplifted a layout from artist Lesley Langdon so I could get a feel of the product...Here's what I came up with:
Be sure to check out thier YouTube channel and let me know what you think!
{{hugs}},
Mimi
Friday, June 24, 2011
UnityTV - Sew Cute Video Tutorial
Happy Friday everyone. I wanted to share a video with you all today featuring a store kit from Unity Stamps. It is "sew cute" This kit will also be on sale in our store Reg. $25.00 on sale for $15.00...That's $10 off MSRP. Hope you enjoy the video. Have a great weekend!
Sew Cute Tutorial by Unity Stamp Company
Thursday, June 23, 2011
It's just not summer without Watermelon
Jillibean's Watermelon Gazpacho that is! This is such a beautiful line. I LOVE the colors. I used the decorative cut-outs and layered them and added foam squares to add dimension. Now all I have to do is catch one of my beautiful niece's dripping with Watermelon juice and add their pictures.
look Watermelon Gazpacho at: http://thatscrappygirl.com/
Tuesday, June 21, 2011
Lemonade for Sale!
Pink Paislee Hometown Summer was perfect for these summer photos I had been hoarding. I used a variety of Pink Paislee goodies on this page including the Punchouts, Border Stickers, Chipboard Shapes and Fruit Stand and Summer Fun patterned papers. (click the photos for a better look)
My journaling didn't show up the best in my photo, but here is some background on these pictures. A couple summers ago I looked out the window and there sat my son in the backyard, sun blazing with an empty cat litter bucket and a handmade sign that read Original Lemonade Stand 25 cents. We live in the county so not sure who exactly was going to be strolling around the yard and need a drink! He was really bummed he hadn't had any customers, so after moving him into the shade, I offered him 50 cents for a cup. He said no Mom, it's only 25 cents - see the sign. (My son is very matter of fact) Then my daughter also had to get into the action with some microwave popcorn. The popcorn even came with some extra grass for additional flavoring. I also never told him he was false advertising since it was really water :-)
Friday, June 17, 2011
Featured Artist: Anna Wesselink
Happy Friday! I received this cute little card from one of the gals in our Club Copic. This darling little girl is actually a digi-stamp from Just Some Lines. Anna took her newly learned skills and techniques from Club Copic and entered a contest. WAY TO GO! So many times, we need to challenge ourselves to take that next step, or go out of the box. How are you going to challenge yourself? WHAT have you been wanting to do or learn? WHAT are you waiting for? Give it a
W H I R L... You never know unless you try! Have a great weekend challenging yourself. I want to hear ALL about it!
{{hugs}}
Mimi
W H I R L... You never know unless you try! Have a great weekend challenging yourself. I want to hear ALL about it!
Mimi
Thursday, June 16, 2011
Embrace imperfection
My scrappy mojo has also been a little stuck lately, so I thought I'd work on designing a perfectly imperfect page. That way if there were any little mojo-missing speedbumps along the way I could just absorb them and keep going.
This is probably one of the greatest scrapbooking lessons my dear friend (and fellow design team member) Linda has taught me - there are no mistakes, just new creative turns in the road to completion. Yes, there were a few "bumps" as I went, but mostly I just kept working around them.
For example, after I drew the line around the upper right corner of the photo, I decided that I really didn't like it. Instead of starting over or being unhappy with it, I decided to incorporate it into the page and use it as a place to ground my journaling.
Here's my scrappy challenge to you this week: Embrace imperfection. :)
Supplies: Cardstock - Bazzill; Die cuts, sparkly buttons - "Hometown Summer" by Collage Press/Pink Paislee; Markers - Copic, American Crafts; Letters - Pink Paislee; Doilies, Mist - Maya Road; Pink buttons - Making Memories, stamps - Unity, Ink - Momento; Font - Bohemian Typewriter (free online).
-Mollie
Wednesday, June 15, 2011
Wedding Bliss
Thank you to everyone that left comments on my last post. I am excited to get started on the wedding album and share some of my creations with you.
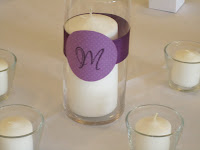
This week I wanted to share with you some of the decorations we made for my sisters wedding using supplies I purchased through That Scrappy Girl. My sister had the florist doing about half of the center pieces for the tables at the reception that were going to be more elaborate so we decided for the other tables we would just do something simple. Below are photos of glass cylinders that we put ribbon around and then glued on a circle (circles/polka dots were the theme) that was cut from the dotted swiss line and then embossed with their "M" monogram that we used throughout the wedding. Then around them we set just plain white votives. Very elegant and simple, yet worked well with everything else working in the room.
These boxes were at every place setting and were used to put candy in from the candy table. We carried the circle and "M" theme out with as well.
This week I wanted to share with you some of the decorations we made for my sisters wedding using supplies I purchased through That Scrappy Girl. My sister had the florist doing about half of the center pieces for the tables at the reception that were going to be more elaborate so we decided for the other tables we would just do something simple. Below are photos of glass cylinders that we put ribbon around and then glued on a circle (circles/polka dots were the theme) that was cut from the dotted swiss line and then embossed with their "M" monogram that we used throughout the wedding. Then around them we set just plain white votives. Very elegant and simple, yet worked well with everything else working in the room.
The BIG HIT of the reception was the candy table that Lindsey and Travis had at the reception. My sister Trish is queen of sugar so this was her project! Trish ordered all purple and green candies - the wedding colors - and assembled this adorable table.
These boxes were at every place setting and were used to put candy in from the candy table. We carried the circle and "M" theme out with as well.
Subscribe to:
Posts (Atom)